Showing posts with label travel tips. Show all posts

Monday, July 27, 2015

England - My Random (But Useful) Thoughts

I covered the basics in a previous post - food, money, transportation, etc. But I keep having random thoughts pop into my mind about things that were fun, or odd, or just things I think I would want to know if travelling to England. So what follows is the most unorganized, straight from my head to this web page, blog ever. Enjoy.


  • The windows at either end of the Underground cars open, so if it's really hot try and stand near the end of the car for some cool air.
Queen's Guard at Windsor Castle
  • There is no where that you can go where you can get up close to the Queen's Guards (red coat, furry hat). They're quite far away at Buckingham Palace, and much closer but still roped off at Windsor Castle. Even if you could, don't touch them, taunt them, pick on them. They're standing in a place of honor, leave them alone. Plus, as this video shows, they will level a weapon at you. And you'll deserve it, for being a git.
  • If you want a free glass of water, order tap water. Otherwise you're getting expensive bottled water. They'll probably ask if you want still or sparkling, but you want tap. Unless you don't want tap, then you want still. Unless you want bubbles, then you want sparkling.
  • Free tours are not free. Well, they are, until the end. You'll be asked to pay what you felt the tour was worth, which is probably around 10 pounds per person. I'd still recommend maybe trying out a free tour. We did one for Jack the Ripper and it was accurate, informational, and entertaining. We felt it was every bit as good as the paid tour we had looked at taking, so we paid the same price - 10 pounds each.
  • British food isn't bad. It's amazing.
  • There are a lot of homeless in London. It's certainly not something I'm used to seeing, being from a small town. But I will say one thing, they weren't beggers. They just sat quietly, often said hello or wished people good days, or just talked with people. I always wished I had some extra snacks in my bag to hand out, but never seemed to. Anyway, give if you'd like, or just spare a 'hello' and smile.
  • I thought people and tea cups would just be everywhere. So cliche. But I really thought I could just walk into someplace, somewhere, and have a cuppa. I only saw one place, in Harrods and it was expensive! Maybe I wasn't looking hard enough. If afternoon tea is something you really want to have, scope out some places online first.
  • Wi-fi is available pretty readily. Train stations, restaurants, public markets - most times when I needed it I could find it. If you're really having a hard time just find a Starbucks. The wi-fi was free everywhere I went except my hotel.
  • Those signs everywhere, warning against pickpockets, are there for a reason. Don't freak out and think London is unsafe, but you do need to remain alert. Keep purses around in front of you if possible, be aware of what's in your pockets, especially if you're in a large crowd. If you're in a restaurant don't hang bags on the back of your chair. Don't leave money or your phone sitting on your table. Even if you're still sitting there! I watched two men come into a restaurant, lay a bunch of papers over a man's phone while they distracted him, and then try to pick the phone up with their papers. They didn't get away with the phone, but they did get away. All of this goes for Paris as well.
  • The English like to rhyme. Just check out the public service posters around the Underground stations. They all rhyme. Cracked me up. Here's a poem for you:
Platforms are really rather long
Which is why it seems somewhat wrong
To stand together in one place
With someone's backpack in your face
By moving down a little more
You'll be much quicker through the door
  • You can get tickets to West End plays for a discount on the day of the show. There's a box office in Leicester Square, very close to the Underground Station.
Elizabeth Tower, home of Big Ben
  • Anyone important in British history was probably named Henry, Edward, or William. They were probably married to an Elizabeth, Anne, or Victoria. Try to keep up. British history also reads like a murder mystery thriller. It's some crazy and interesting stuff, with some of the most macabre occurring at the Tower of London.
  • That big tower with the clock in it, is not Big Ben. The tower is Elizabeth Tower, Big Ben being the 13.7 ton bell inside, which tolls on the hour.
  • Likewise, that big bridge with the two towers is not The London Bridge. It's Tower Bridge. London Bridge is a little more west on the Thames and is currently a rather unremarkable looking bridge. Sorry, London, but it is. The current bridge comes after original timber bridges, the "old" London Bridge that was falling down for 600 years, and a 19th-century stone-arch bridge that now lives in Lake Havasu City, Arizona, USA.

Thursday, July 16, 2015

England - The Basics and What You Should Know

This is a long post, and I'm not sure why it's so long. England is an easy country to travel and navigate. I highly recommend it! So, even though it's long, and I can't figure out why, you should go on and read!


Language:
There's certainly something to be said for traveling internationally but not having to decipher another language while abroad. It makes maps, ordering meals, subway stations, and general life much easier when able to understand signage and those around you. However, there are over a dozen different British accents (for some fun on the different dialects check out Anglophenia's awesome video) and some of them are quite hard to understand for the untrained ear. I often had to ask people to repeat themselves, but no one seemed offended.

Another small hurdle can be the fact that although you can read the words, they might not mean anything to you. Do you know what nappies are? Not light periods of sleep. They're diapers. Don't tell someone you desperately need a nappy. (If you do need a quick bit of sleep, then you need a kip)

Other words and phrases:


lorry = truck
cuppa = a cup of tea
top up = refill
take away = take out food
knackered = tired
cheers or ta = thanks
pudding = dessert
biscuit = cookie
quid  = one British Pound
jacket potato = baked potato
chips = french fries
crisps = potato chips
underground or tube = subway

Transportation:
Surprisingly easy. Figuring out public transportation is what scares me the most about traveling. Even travel within the USA. It's horrifying to me. But the London Underground system is very easy to understand. Each line has a color and a name, the Central Line for instance is red. The trains either go north and south or east and west.


White circles joined by a white line means you will
have a bit of a walk from one line's platform to the other's.

I suggest figuring out your route in this manner:
1. Find an Underground map upon entering the station (they're always easy to find).
2. Find the station you need for your destination (you will need a London city map that shows Underground stations to figure out the closest one)
3. See if any of the colored lines go all the way to the station you're standing in
       3a. If there's one line all the way make sure you know which direction you're going (N, S, E, or W) then follow the signs to the correct platform (e.g. Central Line West)
       3b. If the two stations are not connected by one line pick a line leaving the station you're in and see where it intersects one of the lines going to your destination. There should be a white circle where the lines intersect with a station name - that's the station where you will need to get off and switch to another train. Again, make sure you know which direction you need to be headed for both trains.
4. As an added reassurance that you're getting on the right train, look and see what the last stop is on the line you're getting on. That last stop will be displayed on the front of the train when it pulls in*. Each platform also has a list of stops displayed on big signs. If you don't see your stop, you're on the wrong platform.
5. Signs in the tube cars will show the route and stops so you can keep track of where you are and how many stops you have to go.

*You'll notice some lines split, the Central Line for instance. This is where you really need to pay attention to the last stop on a line. If your stop is after the split,  you'll need to make sure the front of the train you get on has the right ending point on it. If you just get on the first Central Line train you see, it might take the wrong fork.


Can you figure out where all of the letters spelling
London come from?
You'll need an Oyster Card in order to get into Underground Stations. Although Oyster cards can be purchased at stations, you should get a Visitor Oyster card online prior to your trip so that you can use it on buses, the Overground Rail, and National Rail Services. You fill the card with a certain amount of money and any trips are subtracted from the balance. You just touch the card to the round yellow circles at the station turnstiles. If you get a red beep and the turnstile doors don't open, you need to top up your card (put more money on it). You swipe your card again to get out of any station, and the fare is calculated by the distance between your starting station and ending station.

Bus fare is also paid using your Visitor Oyster Card, but you only swipe the card once, when you board. Bus fare is flat no matter how long you're on the bus. Fare is 1.5 pounds and you cannot pay with cash. You must have an Oyster Card. If you have a regular Oyster Card and not a Visitor Card, make sure you've added the Bus and Tram Pass. Buses will take MUCH longer to get you anywhere.

I've made this all sound terribly difficult, but it really isn't. Visitor Oyster Card. Swipe at station turnstile or upon boarding bus. Top up when your money runs out.

Oh one last note, if you're planning on seeing a lot of London make sure your Visitor Oyster Card is good for zones 1-6. Otherwise, look at this map and see what zones you need the card for.

Walking as transportation is great, just remember they drive on the opposite side of the road in London. Pedestrians have the right of way at a crosswalk, but look right first! Then left. Every cross walk has written on the ground "look right" or "look left" though, in case you forget. Apparently a lot of foreigners were getting run over?

Money:


The measure of money in England is called a Pound (also sometimes referred to as a Quid). The pound comes in 5, 10, 20 and 50 paper notes as well as a 2 pound coin. The only other unit of money is pence. 100 pence make up a pound and these all come in coins - 1 penny (a singular pence is a penny), 2 pence, 5 pence, 10, 20, and 50 pence.

The symbol for pound is £ and prices are written as such,  £5.50 = 5 pounds and 50 pence. Something costing under a pound is often written as 50p. That's fifty pence but usually pronounced "fifty-pee". Currently the pound is worth more than a US dollar and the Euro - so things can get a bit expensive.

Food and Drink:
Bangers and Mash are sausages and mashed potatoes. Fish and Chips is fried cod and french fries. That's all you need to know.


That blue bar right under the windows
for people outside to put their drinks
on. Pubs get crowded and the crowd
spills outside.
No, not really. What you should know is that if you go to dine in a pub (which 9 out of 10 establishments are) there's a certain procedure to be followed. If someone doesn't meet you at the door to seat you, you're in a pub. Just find yourself somewhere to sit, figure out what you want from the menu, and find the table number of where you're sitting. Then go to the bar, order, and tell them you're table number. Someone will get your drink right then, and someone else will bring your food. You will pay when you order, so make sure you bring your money to the bar with you.

If there are a lot of people seated, just send one or two people to the bar to order and pay for everyone. Menus are posted outside most pubs, and you should check them out because some pubs don't offer much in the way of food. It's a pub, so it's mainly for drinking.

Do not leave or give a tip in a pub. If someone has seated you, taken your order, brought you a check, etc...then you're in a restaurant and you need to tip  - unless it is already added to your check. Check your check.


Well, I think you can now travel to England without looking or sounding like a ninny.

Wednesday, July 23, 2014

Japan - The Basics: Money

Money in Japan is the Japanese Yen. And it's very easy to get used to. Especially if you read the following!

One US dollar = 101.5 Yen (for now). So if you want to have an idea of how much something costs, you're pretty safe using the exchange of 100 Yen to a dollar. Makes the math very easy, and pretty accurate. So if a vending machine Coke is 180 Yen, you're spending about $1.80. Simple enough. The other rule of thumb, move the decimal point over two places. 1,000.00 Yen is about $10.00.


In the above picture, you can see coins go from 1 Yen, to 500 Yen. Beneath the coins you see the numeral followed by the kanji (written language) symbol for Yen. You'll need to remember that. Yen is also written as ¥. The very bottom is the numerical word. 1 = ichi, 5 = go, 10 = juu, etc. and yen. (Ichi en = one yen)

So on the far left is basically a penny. You won't use it much, but I did use a few. The golden coin with a hole is about 5 cents, the bronze 10 is about a dime, the silver coin with a hole is about 50 cents, the silver 100 is about a dollar, and the goldenish 500 is about $5. You'll use coins a lot! Especially for transportation.

Anything larger than 500 Yen is a bill - 1,000 Yen, 2,000 Yen, 5,000 Yen, and 10,000 Yen (or about $10, $20, $50, and $100).

When you pay for something there will probably be a small tray on the counter. Set the money in that tray rather than handing it to the person. If you don't want your receipt there may also be a small box on the counter that you can put it in to be recycled. Which after receiving a few hundred, mile-long receipts, I think is a brilliant idea!

That should about cover you for what you need to know about money. Other than to have fun spending it!

Monday, July 21, 2014

Japan - The Basics: Accomodation

When planning, I was pleasantly surprised to find that hotels don't have to be that expensive in Japan. I stayed in 3 different ones and I'm pretty sure they were all between $70 and $90 a night. Two of the hotels were in great spots, and the third didn't matter because we were only there to catch the train the next morning.

Desk clerks at hotels speak enough English to check you in or out, but most of them weren't going to be carrying on a conversation with me. When you check in you will need to present the passport of everyone in your group and then fill out a short form. There's a good chance you'll be given an actual key, and not a plastic card.

Hotel rooms are smaller than they are in America, but other than that are mostly the same. Except for the toilets. Japan has some space age, robot toilets. Sometimes there's a normal flusher, but usually there are buttons. A bunch of buttons. I wouldn't sit down and then push them. Stand away from the toilet and push with a stick, cause you can't tell what all of them do. One's to flush. One's a bidet. Two don't seem to do anything. One might heat the seat. One might make flushing noises but not actually flush. It's trial and error. Sometimes showers are a bit weird too. There's a just a bar with two twisty knobs on either side and a spout.. The left knob controls temperature, the right knob controls whether water comes from the spout or the shower head. And if you have a mirror in your shower...well, we couldn't figure that one out either.

All of our hotels had free wi-fi in the lobby, but no where else. One hotel had computers to use in the lobby too. If you need internet you might as well use it while you're in the hotel, because you aren't going to find it anywhere else. At least not free and unlocked wi-fi.

If you arrive at your hotel early, or have to check out but aren't leaving the area, chances are good that your hotel will store your luggage and give you a claim ticket. It's a great resource, which we used at two of the hotels.

I was really worried about being able to find the hotels from whatever train station we were getting off of. And I never really found a solution to the problem. Once we had a taxi take us (not in Tokyo), once we had to ask several people for directions and wander somewhat aimlessly a time or two, and once we found it easily because it was across the street from a major attraction. I would suggest you get a hotel right at a train station or major attraction. Strongly suggest.

I'll give short reviews of the hotels we used in Kyoto, Hiroshima, and Fukuoka. We were lucky enough to use a relative's apartment building in Tokyo. All of the following hotels were great places that I would stay in again.

Kyoto: Kyoto Kokusai Hotel

This was a great hotel! Very clean, quite pretty. It was only a couple of blocks from a subway station that had direct access to Kyoto Station. It's directly across the street from the Nijo Castle (a major historical attraction) so it's easy to find and buses stop right in front of it.

The rooms were nice. Both western and traditional Japanese rooms available. There's a beautiful garden with a pond and swans (babies when I was there). There's a large gift shop that has some really nice and traditional gifts, as well as one of the few places I saw single post cards for sale. Nice and air conditioned lobby with lots of places to sit and enjoy the free wi-fi (lobby only), plus computers available for use in the lobby.

Pay upon arrival, not upon booking. One night was $75 - which is of course subject to change based on time of the year and promotions.

Hiroshima: Sunroute Hotel

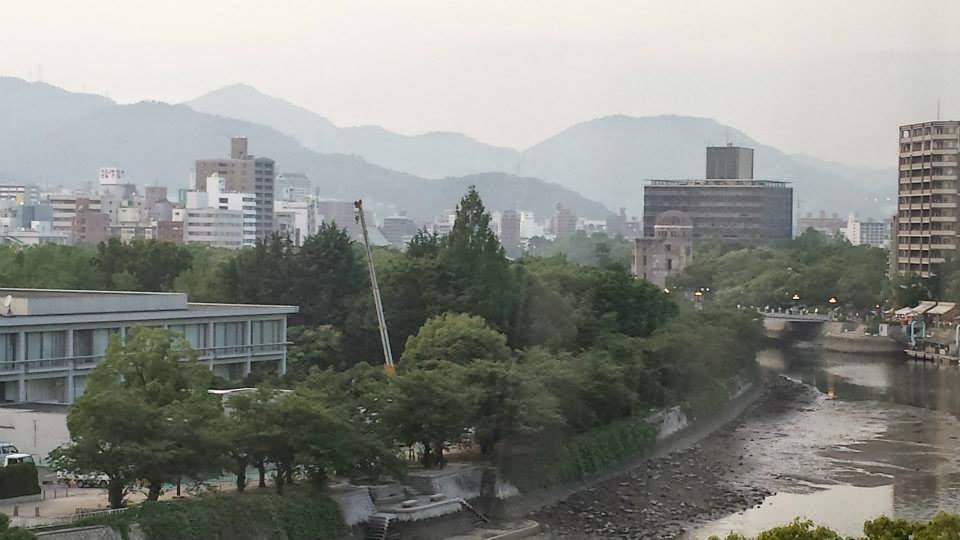
View of the Atomic Dome from our window.
Another great hotel with a great location. Two or three blocks from a streetcar stop, and only one block from the Peace Memorial Museum and Park. We could actually see the Atomic Dome from our room.

Wi-fi available in lobby only. Small gift table in lobby. The rooms were nice. Check in was easy. Around $60 a night. Primarily, this hotel was fantastic for its location.

Fukuoka: Hotel Monterey La Soeur

Since we weren't planning to do anything in Fukuoka, we didn't pay much attention to where the hotel was located. Had I been planning to stay in the city, this might not have been the best location, but I'm really not sure. It wasn't close to a train station, but a taxi ride was around $10.

The hotel was beautiful. By far the fanciest we visited. Our room had a little lobby area. You open your door and you still aren't in. The weird thing was the lights. We could not get any of them to come on, except for the ones by the bed. We flicked every switch to no avail. We finally located a key slot in the lobby area by our front door. Once the key was inserted we were able to turn lights on. When the key was removed, all the lights went off and we could no longer operate them. So, the key card must be inserted to work the lights, but it makes it very easy to turn off all the lights when you leave.

The room was spacious, and beautifully decorated. A little over $80 a night, so we were certainly paying for the fancy. So basically, see what's around the hotel and if it's a good location before you book, but if you want some luxury without paying the price, this is the hotel!


Thursday, July 17, 2014

Japan - The Basics: Food

In case you see yourself in Japan having some Hibachi chicken, rice, carrots and shrimp sauce...don't. That is American Japanese food. Shrimp sauce isn't even a thing outside of the US. They do have chicken though, and lots of fish, and rice. And slimy noodles...

Dairuma - restaurant in Tokyo without a scrap of English
For starters, restaurants in Japan are very small. Some that I went to only sat about ten people And they're tucked in all over the place, very often down a narrow ally off the main road. When you find the ally crowded with red lanterns, you've found the food. You'll also know when you've found a place because many restaurants have a display window with plastic food. There are entire stores devoted to selling restaurants plastic food. But, it'll give you a pretty good idea of what you might be eating.

Restaurant doors are usually covered with a 'noren.' Those are the curtains that seem to cover the top half of the doorway. Just find the slit and walk on through. Most doors slide. It's doesn't matter how hard you push or pull, you need to slide. The person who greets you inside will ask how many in the party, just use your fingers to indicate, and then seat you. Upon being seated you'll be handed an 'oshibori' - a hot towel used to clean your hands and your face if you want.

Menus can be a little daunting. Many places have a menu posted outside so you can see before you even go inside if any of it is in English. Just because it says 'menu' at the top in English, doesn't mean the rest of it won't all be Japanese. They're tricky. It's not too difficult to find somewhere that has a Japanese menu with English translations. Just point to what you want, and the waiter can read the Japanese where you're pointing. Some menus also have pictures instead of or in addition to English.

There are several rules to keep in mind regarding chopsticks. They aren't just an eating utensil. Most places have chopsticks laid out or in a box on the table. Most often they are wooden, disposable ones that need to be broken apart. Some places will provide forks. At least try to use the chopsticks. If you have to ask for a fork, ask for 'foku.'

Don't ever stick your chopsticks upright in a bowl of rice. It resembles incense at a funeral and you can understand why people don't want to see that from the next table over. Don't wave your chopsticks around. If you're not using them, just lay them on the edge of your plate. And don't drum with your chopsticks, although I feel if this needs to be pointed out you probably shouldn't even be in Japan.

When you're ready to order and pay you can wait for your waiter, or look on the table for a button to push. That will signal the waiter to come to your table. The button can be used if you need something, or when you're finished and ready for the check. If you see your waiter you can also put your pointer fingers across each other like an X and they'll know you want your check. Some places you pay at the table, some up front. Tipping is not practiced.

Tea ('ocha') and water ('mizu') are usually complimentary drinks, or can be asked for for free. Some places will have soda and other drinks. Be aware that even though sodas in vending machines are normal price, they can be upwards of 300-400 Yen in a restaurant. And no refills. At least not for free. Don't be surprised to see people drinking beer at 8 in the morning, or to stumble upon a beer vending machine as we did.

Sake (pronounced sa-kay), or nihonshu, is a common alcoholic drink made from fermented rice. It is served cold, hot, or room temperature and sometimes in different flavors. We ordered a single glass, while a friend who ordered hot sake got a ceramic flask and small cups ('choko') to pour it into. It's worth a try.

And food. Sushi. Any time day or night. All sorts. I had it at 8 in the morning at the Tsukiji Fish Market. Chicken on skewers, known as yakitori, is also popular and very delicious. Usually served with grilled onions as well. There's rice, which comes as white sticky rice and fried rice. There are ramen shops and noodle shops. Sometimes there is just a bar outside the restaurant where you stand and eat, but you can also find places to go in and sit down. I found Japanese noodles to be very slimy, and although they tasted good, I had a hard time eating them. I also tried bamboo (quit eating it very quickly when I found out what it was as I'm allergic), Japanese pickles, dumplings, sweet and sour pork, and mostly other normal stuff. And in case you need something American there's McDonald's, KFC, Denny's, Hard Rock and even some Japanese places that just serve burgers and other American staples.

drink menu at The Lock Up
Theme restaurants are popular in Japan, and they do them up. We visited one called The Lock Up in Shibuya. The entire place looked like a dungeon with jail cells where you sat. Hostesses were dressed as police and in order to be seated someone in the party must be arrested. Mid-meal all the lights shut off and a prison break began. This entailed flashing red lights, black lights, spooky sounds, and an angry sounding man shouting Japanese over the intercom. Various escaped prisoners also roamed around until the guards caught up with them. It was a lot of fun and from the food and drinks, to the staff everything was spot on.


Check out these other themed places. I wish I'd had more time - I think I would have tried them all!

I'd honestly say out of everything finding places to eat and things to eat was the most difficult - and even it wasn't difficult. Sometimes we'd just have to pass a few before we found one with English. And I wasn't always 100% sure what I was eating. But like I said...there's always McDonald's.

Tuesday, July 15, 2014

Japan - The Basics: Transportation

Good news everyone, most transportation in Japan has lots of printed English! That's great because transportation in a large city is confusing enough even when you can understand the language perfectly. I shiver just thinking back to the Great Atlanta Bus Confrontation of 2008. By the end of the trip to Japan we had perfected the art of: trains, subways, buses, taxis, street cars, ferries, and ferris wheel. I'd say the ferris wheel was least effective.

So let's break it down...bear with me, I know this is long but it's information I would have wanted to know...

Taxis are expensive in Japan. Avoid them. There's really no need to use them. Of the two times we did once was because we had very, very little time to get somewhere and once was because we were exhausted, dragging luggage, and just flat couldn't figure out how to get to the train station (brain exhaustion too).

Just as an aside - brain exhaustion looks like this: You're standing there, one arm limp at your side, the other arm dragged down past your knee with the weight of your luggage. You're probably in the way and don't even realize it. You're looking around, or at least vaguely left to right but not actually seeing anything. You might even spin around in a slow circle once or twice. And in your mind you're thinking several things "I can't do this anymore...If I just sit down in the middle of the sidewalk someone will stop to help me...I'll pay a taxi everything in my wallet to just take me...and hmmm I haven't had any lettuce in awhile."

Back to taxis. A five-ten minute ride in Nagasaki cost us about 1,100 Yen. Which is just over 11 dollars and average for a cab ride in any other city. I really don't think that's typical. The meter starts out at over 500 Yen (about $5) as soon as you get in the cab. So maybe other cities are ok for cabs, but I've been told multiple times NOT to take a taxi in Tokyo.

Outside the train station in Nagasaki, by the taxi queue was a board that showed popular, nearby attractions, the time needed to get there by taxi, and the approximate cost. That was handy. I assume they can be found at other taxi stands as well. Since we were going to popular destinations the drivers knew what we were saying in English. But I wouldn't say they were fluent. And low and behold...they use GPS. Smart, right?

Here's a great way to check taxi fares between destinations prior to your trip - http://www.taxifarefinder.com

Buses are something I actively try to avoid, but in Kyoto it was the most logical way to get around. There were plenty of bus stops along main roads, and they went to or close to all the major temples. The furthest we had to walk after getting off a bus to get to a temple was maybe ten minutes.

The bus routes are fairly easy to follow. Most stops have a map for reference. Each route is its own color and number, and the numbers are displayed prominently on the front of each bus. Each bus stop also has a board that lists the numbers of the buses that are going to stop there, and which major stops they're going to. That's where you'll need the map. It may list three major stops, and your destination may be in between two of those. But you need to know what your destination falls between, so you can make sure the bus that you get onto is going in the direction you need.

So yes, the easiest way to foul up is getting on a bus going the wrong way. Not a huge deal. You just need to cross the street and catch the bus on the other side. Once you're on a bus a tv screen displays the next stop, a list of the next five or six stops, and other useful things in English. Announcements of stops are also in English.

In Kyoto (this all may change slightly city to city) there's a flat fare no matter how far you're going (around 200 yen, I can't remember exactly - also applies in Tokyo), you pay when you get off the bus, and you  must pay in exact change. If you don't have it, prior to your stop you need to go to the front of the bus and use the bill changer. Don't wait until your stop to do this, do it before! You also generally enter through the back door and exit through the front. Just follow someone's lead.

Streetcars are good for a few heart attacks while touring the city. The Japanese drive on the left side of the road, so several times as the streetcar turned I thought we were going to plow headfirst into oncoming traffic. We only used and saw streetcars in Hiroshima, but they were great.

A flat fare of around 160 Yen gets you most anywhere on the streetcar line  (list of exceptions http://bit.ly/1mRxc94). You will need a streetcar map. You can get it at information in the Hiroshima train station, or find maps at the stops. Better yet, screenshot one before you go. Trains are designated by number and color, with each number running a slightly different route. Stops are then designated by letter and number.


So you see the No. 5 Green line leaves Hiroshima station goes to stop M3, and then turns. The stops then are designated by the letter H because the final stop on that route is Hiroshima Port. The M stops are because the last stop is Miyajima, and so on.

The big purple spots are stops where you can transfer to a different car.So if you need to go to Hakushima (top left) you'd get off at Hatchobori (left purple dot) and change to the No. 9 Brown car. When you transfer tell the ticket man that you are transferring. You will pay and he will give you a transfer card, which you turn in instead of payment when you get off the second streetcar. You have 30 minutes from time of issue to use the transfer card.

You pay when you get off the car, in a little box by the door. If you need change see the man who is sticking his head out the window at stops and looks to be wearing a black purse. Make sure you get on these going the right way too. Signs will tell you what stop the train is going to next, so look at your map and see if it's in the direction you need.

Trains, Subways and the JR Railpass are definitely the most common form of travel. If you are going to be in Japan for 7 days or more, and/or if you are planning on using the Shinkansen (bullet train) to travel to other cities you should invest in a JR Railpass. This pass allows unlimited access to the JR Railway Line, which covered nearly everywhere we went.

The Pass has to be purchased and delivered to an address outside Japan. Once there you can't buy one. You will receive an Exchange Order in the mail. Take that to the airport where you arrive and find the JR office to redeem the Exchange Order for your actual ticket. Yes, that's the only way to obtain a pass.

It was fantastic for inner-city travel in Tokyo. There are far fewer JR Lines than regular metro or subway lines, which makes it far easier to understand. Each line is colored and named and the easiest thing to do is find a good map, like this one, find your start and end point, and trace the colored lines until you find a line that goes between the two - you may have to switch lines to get where you want.

Go ahead and open that map above. The little white dots on the lines are stations, with the names written beside it. You can switch from one Line to another when two Lines are parallel to each other, both with a white dot. For example, on the bottom left, the blue Chuo Line - if you get on at Nirasaki and are going to Shinjuku there in the middle of the map...you get on the Chuo Line to the Otsuki Station (the first white dot on the orange line running parallel to the blue Chuo Line. Get off the train there, find the track for the Chuo Line (Rapid Service) and get on that. You can see that line runs right to Shinjuku.

the station you are in is in the middle, the next station in either direction listed to the side


The JR Pass is easy to use. Instead of going through the ticket wicket just find the little office to the side of the wickets with the glass window and show them the back page of your pass. Do this when entering the platforms and exiting. The pass is also good for some buses and the Ferry in Hiroshima that goes to Miyajima.

If you need to take a train that's not part of the JR system, you just need to buy a ticket. There are automated machines, which have buttons for English. You have to pay an upfront price, so once you've found English find the 'search by station' button. Then follow directions to purchase a ticket. Once you've put the ticket in the ticket wicket to get onto the platform, make sure you get it back out of the machine, and don't lose it! You'll need that ticket to get out of the train station too.

If you end up going further than you bought the ticket for, don't worry. When you try to exit through the ticket wicket you'll see someone behind a glass window to the side of the gates (same place you show your JR Pass). You'll just need to pay them the additional fare.

Make sure you get on the trains going the right way! Stations are insanely clean and well stocked with food/drink options and shopping. Getting on and off trains is pretty organized. Lines form to either side of the doors for people to get on, after letting people off through the center of the door. Trains get extremely crowded, there are many times you will have to stand. And you'll be getting to know your neighbors.

The Shinkansen is a must if you're visiting more than one city. It's covered by the JR Pass except for the Nozomi Line and the Mizuho Line. The map on this page best shows the Shinkansen Lines and what stations they visit. Click on each Line to see the specific stops that train makes.

Shinkansen trains are divided into reserved (or green cars) and non-reserved. Reserved tickets and passes cost more, but you'll be sure to have a seat. The first three or five cars (depending on the Line) are non-reserved. They're cheaper, but seats fill up quickly and you could end up standing.

At a train's last stop before heading back the way it came you'll see a cleaning crew waiting to board the train. They take about five minutes to very efficiently clean and turn the seats around so they're facing the right direction. Lines will form at the boarding doors, so fall in. Luggage can be stored in overhead bins, large luggage can be stored in the empty area at the back of each car. There are bathrooms and snack/drink service on these Lines.

You may have to change Shinkansen Lines to get where you're going as well. An information counter in the station will be very helpful. Tell them your destination and they'll write you out an itinerary, complete with departure times, Line names, and platform numbers. And those trains pull out on the dot, so don't lolly gag.


Phew - I know that was a lot, but sometimes transportation once on vacation can be the biggest headache. Hopefully this will save you some time and some guessing!

Friday, July 11, 2014

Japan - The Basics: Language

First of all, don't be daunted by traveling to Japan. It's really not that hard! And my job here is to make it even easier - at least that's what I'm striving to do. There's a lot of information I have to impart, so there will be a series of blogs regarding my trip to Japan, the experiences I had, and what I think you should know about this amazing country.

To start, let's get out of the way the things that everyone should consider when traveling to a foreign country: language, money, transportation, accommodation, food, and general cultural knowledge.

Language:
Japanese. Obviously. And the vast majority of people only speak Japanese. Plus you haven't got a prayer of reading Japanese unless you've studied it. The written language is a combination of Kanji (Chinese characters) and two other things called hiragana and katakana. You don't need to know this.

English and Japanese Sign

English isn't a common spoken language, but you will see English writing fairly often. Major cities (Tokyo, Kyoto, Hiroshima) have enough written English to get an English-speaking traveler by. You may find someone every now and then who can speak English, at least a word or two (hotel receptionists, train station employees, etc), but even then - no difficult questions and not much more than can be answered with a gesture. Once you're outside of a major city, don't count on finding any English. Learn to pantomime. It never hurts to ask someone for help in English though, if they don't understand you they'll just say "no" or "sorry."

The Japanese also have a funny habit of titling things with English (Lunch Menu at the top of a menu) and then listing everything else in Japanese. So you know it's a lunch menu, but you won't be actually ordering any food off of it. They also have a habit of rambling to you even after it's incredibly apparent you don't understand them.

Train stations always have the train stops and locations written out in English and the announcements of upcoming stations once on a train are in English (80% of the time). Some maps are in Japanese, but you can usually find an English one nearby. Signage in many buildings and transportation centers will usually be in English so you know what to do/where to go.

Japanese Menu in English
This menu has pictures and English - double win!
And lastly, if you look lost enough, for long enough, someone may come up to you ask ask in perfect or broken English what you need help with. One day in the train station after we stared blankly at a map on the wall for several minutes a nice gentleman came up and asked where we wanted to go. I told him the train we were looking for and he motioned for us to stay put (he was willing to help us even though he spoke little English). He went to an information counter and got directions. He then personally walked us about three minutes through several floors of the train station right to the platform we needed. On the way he asked where we were from. I told him, and next thing I know he's excitedly playing us The Star Spangled Banner from his phone. People over there really made me happy.

Another day a man who was enjoying a day at the park with some friends/family came and offered us cookies. He didn't speak any English. Just stuck the bag out in front of us and said "free." When neither of us moved except to look at each other with confused expressions, he just took a cookie out of the bag for each of us. We knew it would be rude not to accept, and further more not to eat. Plus all those other people were eating them, so we figured it was safe. Plus, rude! You can't be rude in Japan. The cookies tasted like fish. But I made sure that man thought it was the best thing I'd ever had.

So there you have it. Most people will be content to "communicate" with you no matter who speaks what language. An old woman had a conversation with me on a train one day without me ever speaking back to her. She might have been going off about bananas for all I knew. They want to be helpful and friendly, so just try your best to do the same!

Here are some words I learned...whether or not they are useful is up to you!

Itai (e-tie) - ouch
Arigato (just as it's spelled) - thank you, familiar
Arigato gozaimasu (just as it's spelled) - thank you very much, formal
Mizu (me-zoo) - water
Sumimasen (sue-me-ma-sane) - excuse me (to get someone's attention)
Gomen nasai (go-men-a-sigh) - sorry
Hai (hi) - yes

My pronunciation may be a bit off, but you get the gist. Another good idea is to use Google translate on your phone to translate some key phrases like, "Can you help me get here", "I need the police", or "Where can I find a big piece of chocolate cake?" Once the translation with the original text is on your screen take a screen shot. We showed a man a screenshot of "How do I get here" and then pointed to a map and he pointed (literally) us in the right direction.

Wednesday, January 22, 2014

32,000 Feet Heist: Thefts on Planes

I'll be honest, the thought of being robbed at 32,000 feet never occurred to me - until I watched CSI last week. Who says television doesn't teach you anything?

Airport theft isn't a problem that should have all of us driving to our next destination, but it happens. And not just at cruising altitude. Absolute Software, a company that provides recovery and tracking of lost electronic devices keeps track of airport thefts. It breaks down like this**:

- 25% Luggage Claim/Storage
- 24% Plane
- 18% Check-in/Security Area
- 18% Other
- 15% Terminal/Boarding Area

Luggage claim seems like an obvious one. With some people not arriving until bags have already started to circulate, I imagine it isn't that difficult to walk away with someone's entire suitcase. Thieves also target people at security. If you have several bins going through, and someone ahead of you holds up the line, your stuff could just be sitting at the other end of the conveyor belt while you haven't even gone through the metal detector.

A would-be thief watches for people who look flustered and confused at security as well. They're more likely to forget something, or not pay attention to their items. A tip for security: put your most valuable items through last to ensure you're standing there waiting for them when they come through x-ray.

What about in-flight? Thieves often buy a seat in the aisle near the back of the plane and use pre-boarding to get on first. Then they watch everyone come on the plane - who has a fancy bag, who stores a laptop case, or a computer bag? They memorize where these items are placed. They might even get up after and put a bag they are carrying next to the bag they want to hit. Then they wait awhile, until everyone is reading/watching tv/sleeping, get up to check their bag, and snag something out of the bag next to it. Who's going to notice? Especially since more often than not, your bag isn't even above your head.

When I think about how easy it would be for someone to steal something out of a bag in a storage bin, it makes me not want to put my things in a storage bin. But sometimes you have to. So to keep your things more secure:
1. Keep valuable items in a smaller bag at your feet
2. Place your bags in the overhead storage bin with the zippers facing in and down, wheels out (yeah, I don't think that's the way they tell you to do it, but it's your stuff in there!)
3. Lock the zippers on your bags if you are storing something valuable (probably don't put the lock on until after security)

I know those are all really obvious things once you think about it, but who thinks about it?! I know I will from now on!

**Thefts are difficult to track as most victims don't even realize an item is missing until they unpack. Even if it is noticed, once passengers are off the plane they're next to impossible to track down.

Monday, December 23, 2013

How the DMV can mess you up with the TSA

My license expired last week. I didn't mind so much that I was driving around with an expired license because I couldn't find time to devote to an 18 hour visit to the DMV, I just knew I had to do it before Christmas Eve when they closed because I needed an updated license to get through security at the airport. At least I figured I did.

I figured correctly. What I did not figure correctly was that laws had not changed since my last license was issued and you no longer walk out of the NC DMV with a little plastic card confirming to everyone your height, age, and that you are who you say you are. Nope. Now you walk out with a piece of paper that serves as a temporary license until your real one arrives in the mail in 10-12 business days.

It actually took awhile for it to sink in that now I had no valid ID for airport security. I was able to retain my old license so I thought, 'eh, maybe this'll work after all.' But a quick Google search and my original figuring was confirmed - an expired ID is no good.

The official statement on the TSA website is "If you lose your primary ID or it has expired, TSA may accept other forms of ID to help verify your identity." Not entirely helpful. The next FAQ is what if an ID is lost during travel. In that case (and I assume in the case that you know exactly where your expired license is) you will need:
- Two forms of ID (social security card, birth certificate, marriage license, credit card, etc.) containing the name of the passenger
- One of the two forms of ID must have one of the following: date of birth, address, gender, or a photo

The website then goes on to say "If TSA can confirm the passenger’s identity, they may enter the secured area, but they could be subject to additional screening." That sentence contains an if, a may, and a could. So vague. There's also a bit about using "publicly available databases." So I don't really know.

Bottom line - be sure you have an up-to-date form of ID. For what counts as an ID, visit here.

Luckily, I remembered I have a passport. First domestic trip with a passport!

Monday, October 28, 2013

Travel Essentials

Everyone has certain things that they can't leave without when going on a trip. Of course things like phone chargers, socks, a book...but there are some things that make travel easier that you might not think of. Here's what I always like to have when I travel.

Empty Laundry Bag -
If your'e staying at a hotel you can usually grab a plastic laundry bag out of the closet and throw your dirty clothes in it. But to always have with me, I use a fabric bag from a dollar store. Keeps my clean clothes away from my dirty ones, and makes unpacking much easier. Laundry bag straight to the laundry room!


Hobo Bag and/or Wristlet - 

If I don't need to carry much beyond cash and my phone then it's wristlet time. 
If I'm out and about in the city for the day then I ditch the purse and the wristlet for a hobo bag. It fits all my stuff, plus any little things I buy that I don't want to carry around separately. I'm less likely to set a hobo bag down and lost it if the strap is across my body, plus in large crowds I can move it to the front of my body to keep an eye on it.


Wisps -
These little water-less toothbrushes are perfect for overnight flights. If you really didn't want to get up and go to the bathroom, you could actually brush your teeth in your seat. They give you just enough freshness to feel a little human again during a long haul - by air, sea, or road.


Headphones -
The reason is fairly obvious, but I go for headphones instead of ear buds because they block out more background noise, especially on a plane. But whatever you're using to hook up and listen, bring your own. Some airlines still charge. Plus, even if you don't want to listen to music or watch tv, headphones can save you from a chatty neighbor.


Bandanna - 
There are a ton of good reasons to have a bandanna around. If it's hot outside it makes a good forehead mopper, ya know, for sweat. Bandanna's are easy to tie around your wrist if you don't have pockets. You can use it to tie back hair, or as a headband. If you were really desperate you could use it to make a tourniquet. Or rob a bank (not advised). Maybe create a make-shift, literal hobo bag. Sky's the limit.


What do you always have to pack??


Thursday, April 18, 2013

Mesa Verde, Colorado

I really laid off of my obsessive planning habits for my trip to Colorado. I was ready to just go with the flow, except for one thing. I pretty much insisted we make the two hour trip out to Mesa Verde.

We didn't know if we should drive ourselves or take a tour, but it ended up that taking a tour was going to be  much easier for us. The prices were reasonable for an all day trip, especially since it was a two hour drive. We were recommended Wilderness Journeys from a friend, and they were fabulous!

The tour left early in the morning with one pit stop on the way to Mesa Verde. Our park fee ($10-$15 depending on the time of year) was covered, but the tour guide, John, stopped to get tickets and picked us up brochures. We had a fairly long drive to the top (20 winding miles), but it was beautiful and John stopped often to allow us to take photos. We could see all the way to Utah  as clear as the day was...or maybe Utah just isn't that far.

Spruce Tree House
Because it was winter, the only cliff dwelling we could visit was Spruce Tree House. This dwelling is located next to the Chapin Mesa Archeological Museum. Most of the year this would be a self-guided tour, but we met up with a Park Ranger to take the tour. They offer tours three times daily in the winter and I would recommend it. You'll learn far more. Several of the other cliff dwellings require a tour guide so be sure to check on times. Hours and tour times are listed for each dwelling here.

After the tour we had lunch in the cafeteria and visited the museum. Lots of interesting artifacts in the museum and a short, but good, informational video. And of course a gift shop!

Down in a Kiva - an underground room used for religious purposes
On the way down John took the Mesa Top Loop Road which gave us views of more dwellings - Square Tower House, Cliff Palace (the largest dwelling), and several surface dwellings. Not to mention some of the views we had of the surrounding mountains and valleys, which were amazing. John was able to teach us quite a bit as well.

A dwelling across the box canyon
Although I don't seem to have written much, this was a full, long, wonderful day. I slept all the way home (the biggest bonus of a tour!).

If you're planning a visit most importantly you need to check the online schedules to see what is open and when tours from Park Rangers are offered. Also see which tours are self-guided, and which require a Park Ranger. Getting to the dwellings can be difficult. Trails are steep so make sure you are of able body. John assured us that the park is crawling with people in the summer and much more enjoyable in the winter months. Even though we could only visit one dwelling, the views of the others made me agree that winter would be best. There are a ton more things to do that I'm not even getting into, so spend some time perusing their website http://www.nps.gov/meve/index.htm to learn more!

Thursday, April 4, 2013

Are You Traveling Somewhere Safe?

Every now and then a horrible story will hit the news about a traveler who is beaten, kidnapped, killed (most recently in Brazil). This certainly decreases travel to those areas, as expected. Some places are just better left alone and not visited. And not all those places may be immediately obvious.

When planning a trip the first thing you should do is research to make sure your destination is safe for tourists. Check again right before you leave for the trip. It may be that certain areas should be avoided, or maybe just after dark. But following the advice of Foreign Affairs agencies should be a major priority for any traveler.

The following site is maintained by the Government of Canada...but hey, not safe for Canadians equals not safe for Americans. Each country shows the level of caution that should be taken, as well as if travel should be avoided all together. Clicking on a country will show international advisories and reasons caution should be employed.

http://travel.gc.ca/travelling/advisories

A map of advisories is also available on the site.

Wednesday, April 3, 2013

United, US Air, or JetBlue?

In the past month and a half I've been on 10 airplanes. I realize for some people that's nothing (people like...pilots for instance), but for the average person that's a lot. Six of those planes took me to and home from Colorado, and those were all United Planes. Two of the planes took me to and home from New York, both JetBlue. And finally US Airways took me to New York again, with JetBlue taking me home. So how do these three airlines stack up against each other and which would I recommend hands down? Let's find out.

United is a perfectly fine airline. I had no problems per say - but they will nickle and dime you to death. Only  using dollar bills and fives. First of all there's a $25 for checked luggage, and that's your first bag. The second bag is $35 and increases with each consecutive bag. Not uncommon for airlines these days though.

Then you get on the plane and have the pleasant surprise that there's live Direct TV in the back of the seat in front of you. At least most likely, not all planes may have been upgraded to this yet. Either way, unless you're going to shell out another six bucks you aren't watching that tv. After about 30 minutes of teasing the tv shuts off unless you swipe a credit card. At least they provide you with free headphones to listen to your paid-for-movie or the free radio in your arm rest. The headphones are in the seat pockets if you're wondering. If you get an older plane, back when they gave you entertainment for free, you might be watching a pre-selected movie on the tvs that drop down from the ceiling. They apparently haven't figured out a way to charge per customer for that.

Now comes the beverage cart. You'll get your drink for free. But that's it. If you want something to eat you'll have to pay for that too. And nothing comes cheap.

I had several delays (including an hour on the tarmac) with United, but with bad weather being a factor I don't know how much was avoidable. My luggage did make it to Durango before I did, and while that's better than later, how come I couldn't be on the earlier plane? I also encountered my only rude stewardess on a United plane, for whatever that's worth.

Skytrax, a global program that measures airline quality through detailed audits, gives United a 3 Star rating. Click here to see their full ratings.

JetBlue starts off on the right, and cost-effective foot by offering customers their first checked bag at no cost. The money saving continues on the plane as you're served drinks and snacks for free. Snacks are varied, as are drinks (although they're missing the cran-apple drink that is my airline favorite). If I remember correctly drinks are pre-poured into a plastic cup and you don't get the entire can, but that seems like a small trade off. They also get drinks three or four at a time, which seems to go faster and there's no drink cart bashing in people's elbows. On the last flight one of the flight attendants was passing out water before everyone was even in their seat. How nice.

Entertainment? Sure, how about some more live Direct tv? How about not paying for it? Watch tv for free, or purchase a movie, you're choice. They'll get you $2 for the headphones though, which you can purchase at the gate or on board. Or simply bring your own for the tv or radio. JetBlue also has more leg room than the other airlines. They must just make longer planes.

In my experience: no delays, friendly staff (friendliest I encountered all together), and an extra $40 in my pocket when I landed. Skytrax gives JetBlue a 4 Star rating. Click here for more detail. A note that out of over 681 airlines only 35 are 4 Star and only 6 are 5 Star.

US Airways is not much different from United. A charge for luggage, a charge for a snack, and (at least on the plane I was in) no entertainment at all. The only perk you're gonna get here is a free drink.

I encountered another hateful employee who chastised me for my carry on luggage. I've been using the same bag for three or four years and never had a problem, but she told me not to use it again (everything short of wagging her finger in my face). Rude.

Skytrax awarded US Airways 3 Stars. Click here for details on their rating.

So who wins the battle of the airlines in my book?

JetBlue. Hands down.


Monday, March 18, 2013

Durango, Colorado

Downtown Durango is one of those places where you feel like you'd be at home on a Sunday morning just strolling down the sidewalk, enjoying the sun, and not having a care in the world. Do a little shopping, maybe grab a beer (ok, maybe it's Saturday), and just enjoy yourself. To sum it up, I loved Durango.

Chimney Rock in the center, Companion Rock to the right
It's a great day trip from Pagosa, and an easy drive that's about an hour long. Plus on the way down 160 you can take in a great view of Chimney Rock and Companion Rock. If you don't want to just grab a picture from the side of the road and want to have a fuller Chimney Rock experience, you can do that too. Highway 151 will take you to the Visitor's Center where you can grab a guided or self-guided tour for $12. Guided tours will offer more of a complete visit of the grounds, including ancient structures of the Ancestral Puebloans. Self-guided tours are limited to the Great Kiva Trail. Four guided tours are offered each day, self-guided tours are available 10:45 - 2:45. There are also some special tours such as the Full Moon Tour. Through October 1-May 14 there is limited access to Chimney Rock and the gates are closed to vehicles.

Durango Train Station
So let's get to downtown Durango. We started at Main Street by the Durango Train Station. The station has a museum and gift shop, and is the starting point for the Durango & Silverton Narrow Gauge Railroad trips. There are several tours leaving the station, going through the San Juan Forest and along the Animas River. Be aware that the normal train route is abbreviated November through May and does not go all the way to Silverton and instead stops at the Cascade Station. Check for schedules and rates. Even if you don't plan on taking a train ride, the station is beautiful and worth a stop.

We walked down Main Street just going into any store that caught our interest. There are a ton of souvenir shops and I went into nearly every one of them. I'm a sucker for those types of stores. Good thing I was with someone very patient! Just as plentiful are the sports and ski shops. There are four major breweries in Durango, and one of them is on Main Street - Carver Brewing. I'm not much of a beer drinker, so I'm not the best to comment on the breweries, plus this was the only one we went into. The other ones in Durango are Ska Brewing, Steamworks Brewing, and Durango Brewing. Carver, Steamworks, and Durango serve food as well, but the menus are limited.

The "trail" we followed
A cave we climbed down into
After shopping and enjoying downtown we got back in the car and headed out on highway 550 about 30 miles to Cascade Falls. The entrance was all snowed in but we went down the road a little ways and just parked in the middle since no one else was around. But apparently if you keep going down the road you come to a red gate that you can open and go through and park at the Cascade Creek trialhead. From there there are two trails, one on each side of the creek - the trail on the west side is the better of the two. However, we just roamed off on some trail through the snow that a bunch of other people had made and wound our way down the side of the gorge until we reached the waterfall. The entire waterfall was frozen, and you could tell people had been ice climbing on it. It was beautiful. The hike wasn't particularly easy, the snow made it slippery and it was very steep. But we stumbled upon a little cave with giant icicles on the way that was very cool. The hike back up was worse and I really felt the altitude on this one. Dearly missed the oxygen saturated air of home.
Cascade Falls covered in ice
After a hike that nearly killed me we headed back to town for some lunch. Serious Texas Bar-B-Q. Oh. My. Heavens. I had the most amazing food! The menu isn't too big but all you need to know is Texas Taco. Chopped bar-b-q, cheesy potatoes, onions and jalapenos (not for me though) on a soft flour tortilla. Splash some of their bbq sauce on there and you'll be in heaven. Plus - if you're a southerner having sweet tea withdrawals, their sweet tea is spot on. So have all the beer you want at the breweries, but seriously...have some Serious Texas Bar-B-Q.

I would have loved to have had more time in Durango. It would be great to spend a week just exploring in the surrounding mountains. There are also hot springs in Durango - Trimble Hot Springs and one on the side of 550 that's actually quite beautiful. You don't soak there, but we pulled over to take a closer look and some cool pictures. No matter what you're doing though, Durango is sure to please!